We will be covering the various techniques and materials involved in woodturning inlay. Using a rotary-tool handpiece and a 1/16" upcut spiral bit, we will learn how to make a mortise and inlay. Read on to learn more. Try it! This simple yet rewarding project should be a joy! Inlay is a must for any woodturning project!
Techniques
Inlay techniques may be an essential part of any woodworking project. Inlays can enhance the piece's aesthetics and add depth to it. There are many methods to create beautiful inlays. Each of these has its own advantages. This article will give you a guide to the different methods available. Continue reading to learn more. Preparing the wood will be your first task. You can clean it with a damp cloth or a paper towel. You may want to apply some mild dish soap to remove dirt and other residue. You should be careful with chemicals as they can damage wood. Hand tools are also an option, even though routers are commonly used to cut wood into inlay designs.
You can also use inlay techniques on other materials. You can inlay metal, wood, or stone as an example. If inlaid pieces are done properly, they can provide a striking contrast image. You can use a variety of inlay tools to secure the inlayed items in place, including jigs, knives and fixtures. Inlaying can take place before or after you turn the wood. After turning the piece, inlay materials can be added to the top and bottom.
Materials
Using a wide variety of inlay materials to cover the surface of your finished object will give your piece more visual appeal. Inlay materials are able to be used to cover many different types of recesses. Inlay materials may also be used for covering screw heads or brad nail positions. To create these beautiful inlays, follow these steps.
The first step to creating an inlay is choosing a material. This is why some materials are better suited than others. People may feel more comfortable using resin inlay, which doesn't require you to cut intricate pieces or fill in gaps after mortises were made. Additionally, resin is available in many colors, which can be magical at times. Here are some tips to use resin as an inlay material.
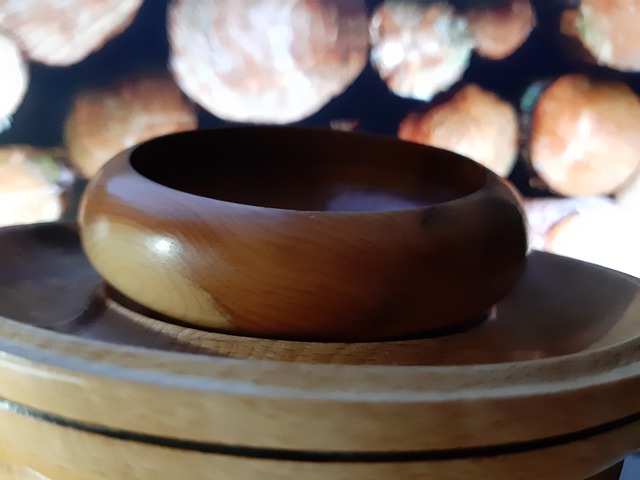
Installation

Inlaywork is a decorative method that can be added to woodturning objects. Woodturners can learn how to install woodturning inlays by following Ron Hampton's detailed instructions. He demonstrates how to install inlays on tops, bottoms, and bowls. He explains safety guidelines and the importance of precision in the process. This technique adds a unique touch to the wood turnings. Woodcraft has a wide selection of inlay bandings.
Before installing woodturning, you must prepare the base of your piece of wood. The best way to achieve the best results is to use a plunger router. Attach the template to the base of your router. The bushing should be pressed in the correct position around the guide collar. After placing the inlay, make sure the base is flat. Installation will be simpler if the inlay has an angled edge. The inlay will be more easy to install if the router has a bit that is slightly larger that the mortise.
Maintenance
There are a few steps to take care of your woodturning inlay. Before putting your inlay in your woodturning project, you need to clean it thoroughly. This is especially important when using CA glue for stone inlay, as the fumes can be hazardous. A 3/16" allen wrench can be used to measure the inlay's depth if you have limited space. To avoid scratching your inlay, sand it down to 120 grit.
FAQ
Are you a genius in order to master woodworking?
No. Woodworking is not rocket science. Anyone can learn how to use basic power tools and techniques to create beautiful works of art.
What is the difference in plywood and particleboard?
Plywood is a combination of layers of wood, which are then pressed together under high pressure. Plywood comes in several thicknesses and is commonly used for cabinets and flooring. Particle board is made up of sawdust mixed in resin, then compressed into large pieces. It's used for home improvement projects. Both boards can be cut easily and are both durable.
Is it difficult to start my woodworking business?
It is not easy to start a woodworking business. You will need to adhere to many legal requirements. You don't have to go through all that hassle of setting it up. Many people choose to join existing businesses. You will only have to pay membership fees, taxes, and other charges.
What kind and type of wood should i use?
Woodworking is a popular job that involves oak, pine and maple. Each wood type has its own characteristics which affect the final product's appearance and feel. Oak, for instance, is darker and harder than most other woods. Birch is light and soft, while mahogany can be heavier and more dense. There are two options: solid wood and veneers. Veneers are thin sheets of wood that are glued together to form a single layer.
What's the difference between a hobbyist and a professional woodworker?
Hobbyists are passionate about making things from wood, while professionals tend to be more focused on the quality and craftsmanship of their work. Hobbyists often take pride in the creations they make and often share them to family and friends. Professionals will spend hours researching designs and then begin to create a project. They will pay attention to every detail, from selecting the best materials to finishing the project perfectly.
What is the average time it takes to finish furniture?
It depends on what size piece of furniture you have. Smaller projects like boxes and picture frames can be finished within one day. Larger projects like dining tables and desks require several days. It takes time to properly stain and seal wood.
What type of tools does a carpenter use?
A hammer is the most commonly used tool by carpenters. A hammer can be used to drive nails into wood. It is also used to help hold pieces together while working on a job. Other tools include clamps.
Statistics
- Woodworkers on the lower end of that spectrum, the bottom 10% to be exact, make roughly $24,000 a year, while the top 10% makes $108,000. (zippia.com)
- Most woodworkers agree that lumber moisture needs to be under 10% for building furniture. (woodandshop.com)
- If your lumber isn't as dry as you would like when you purchase it (over 22% in Glen Huey's opinion…probably over 10-15% in my opinion), then it's a good idea to let it acclimate to your workshop for a couple of weeks. (woodandshop.com)
- In 2014, there were just over 237,000 jobs for all woodworkers, with other wood product manufacturing employing 23 percent; wood kitchen cabinets and countertop manufacturing employing 21 percent. (theartcareerproject.com)
External Links
How To
How to stain wood
Staining wood is the process of applying chemicals to the wood's exterior, which alters its color. This chemical reaction causes the wood color to change from white and brownish red. The most common type of wood used for staining is oak, although many other types of wood can be stained.
There are several ways to apply stains to wood surfaces. Some methods involve mixing the stain with a solvent (such as turpentine) and then brushing or spraying the mixture onto the wood. Some methods involve a mixture of water and dye that is applied directly to the wood. You can also mix stains with varnishes or paints so that they become part the finish coating.
The first step in staining wood is preparing the surface. To apply the stain, clean the wood completely. Sanding smoothens scratches and rough spots. Then you must decide what kind of stain you want to use. There are two main kinds of stains available: non-penetrating stains and penetrating. Penetrating and non-penetrating wood stains penetrate deeper than other types, making them perfect for dark colors like mahogany. Non-penetrating oils work best when used with light colors, like maple.
You will need to decide on the type of stain you want to use, and then prepare your tools. A paintbrush works well for applying stains because it allows you to spread the liquid evenly across the surface. After you're done painting, make sure to have some rags handy to remove any excess stain. You should have enough containers to store the various components of the stain mixture if you intend to mix it yourself.
Once you have prepared your materials, start by cleaning the area where you plan to stain the wood. To remove dirt and dust, use warm water and soap. Wipe down all furniture pieces with a dampened cloth and clean water. You should remove any debris, especially if your plan is to stain darker wood.
Apply the stain. Next, apply the stain to the furniture by starting at one end. Slowly and carefully work your way along the grain to reach the opposite end. The stain should not drip off of the wood's edge. Before moving on to the next steps, allow the stain drying completely.
A coat of clear polyurethane sealing agent is applied to protect the paint. Apply three coats polyurethane sealer. Allow the third coat, which should dry overnight, to dry before sanding.