If you need to cut tight curves, your band saw blade is just as important as the model it came with. The blades on the cheaper models are often less expensive. While professionals may have several blades, DIYers usually only have one. When choosing the right band saw blade to cut tight curves, there are many factors you should consider. The width of the blade should depend on the type of cut you're making. For delicate work and straight cuts, narrow blades will work best.
Variable Pitch
If you have to tackle a tight curve you might wonder if a Variable Pitch Band Saw blade is right for you. Read on to learn how to select the right blade. This blade can cut closed openings and tight curves with ease. First, make some relief cuts around the curve to allow the blade enough room to turn. To clear the path for your blade, make relief cuts.
The best thing about this band saw is the high-quality of its teeth. The band saw's teeth can withstand multiple forces while cutting through two walls made from tube steel. As the saw advances forward, it releases the tooth by the downward feed force. Thicker chips, on the other hand, tend to stick to teeth and cause problems with the cut quality. The groove geometry allows for proper coolant flow, which helps flush out any chips stuck to the teeth.
Regular-tooth
Wide blades are recommended for cutting curves. The radius of your cut is determined by the blade's width. Blades with a smaller width are best for narrow curves. Blades with a larger width are better for resawing or line cutting. To determine the correct blade width for any given job, refer to the table below. The chart offers general guidelines regarding blade width selection.
When choosing a regular-tooth band saw blade for tight curve cutting, keep in mind that it will be subject to higher temperatures. This means that the blade will require more force to be able to cut a certain part. Also, your blade will drift in one way while cutting, which can increase the risk for burns and smoke. To prevent this from happening, you can put a layer of wax or tape on your blade to provide lubrication.
0deg. Rake angle
For the most accurate results in cutting tight curves, the 0deg. rake angle of a band saw blade should be set for optimal results. This angle will ensure that the cutting edge has a smooth, continuous edge. There should be little buildup. Although the rake angle cannot be directly measured, it can be approximated by a force gauge acting in a straight line to the cutting edge. In addition, cutting ratio values can also be empirically determined either directly, or indirectly.
To determine the best angle for rake, measure the radius of the cut that you are trying to make and compare it with the kerf. You should remember that different bandsaw blades can produce different kerf sizes. You need to be aware of the material used in your material before you choose the right band saw blade. A scrap of wood can be used to check the rake angle on the bandsaw blade.
Wood Slicer
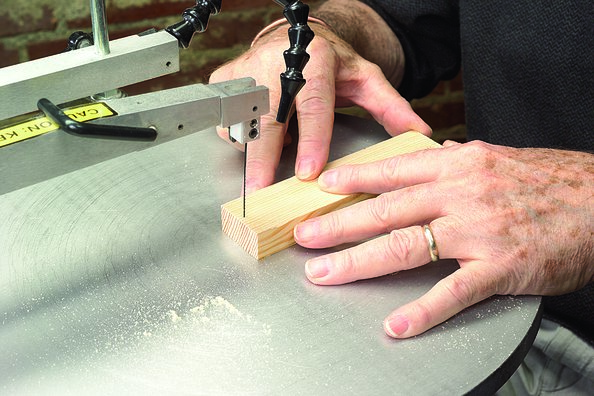
A band saw can be used to easily cut small curves or open openings. You can make a few relief cuts to your workpiece to simplify your job. These cutouts give the blade more room to turn. You should also make sure that you remove any waste from each cut. This will give it more room for turning. After you have completed the workpiece, turn off the blade.
A 1/4-inch blade will work well for most curves and small inside cuts. A 1/4-inch blade allows you to make precise inside cuts and not let the blade drift. To get a precise cut, however, you will need to make intersecting cutting cuts before cutting. For tight curves and corners, be sure to adjust the depth gauge on your saw to prevent binding. Alternately, you could use a bigger blade and a smaller radius to make the cut.
Freshcut 37

The Freshcut 37 bandsaw blade will allow you to cut tight curves on your bandsaw. The blade features a relief cut, which allows the blade to finish the curve before moving on to the next step. The blade can work around the cut by removing small bits of waste that make it possible to turn. Before you begin cutting curves, make sure that you always back out any cuts. This will keep the saw from twisting as you cut the next curve.
If you need to cut very tight curves on your bandsaw blade, you might consider a variable pitch one. This blade is capable of cutting a wider range of materials, including wood, metal, and even plastic. This blade's variable pitch is ideal for many different applications. This saw blade is ideal for cutting plastics, metals, and composites. The band saw blade is constructed from heat-treated, durable steel to ensure added durability.
FAQ
How much do hobbyists need to invest in starting a business?
To start your own woodworking company, you will likely need capital to purchase the necessary tools and other supplies. Start by getting a small circular saw saw, drill press or circular saw. These items aren’t too expensive so you won’t have to break the bank.
Do you have the skills to learn woodworking?
The best way to learn anything is by doing. Woodworking takes practice, skill, patience and experience. Mastering any craft takes time.
You can learn the most effective way to master a skill is by actually doing it. So start small and build on what you have learned from there.
Do I need to be a genius to succeed in woodworking?
No. Woodworking does not require any special skills. You can create beautiful pieces of art by learning how to use simple power tools.
How can I organize my shop?
First, make sure you have a designated space for tools storage. Make sure your tools are clean and free of debris and dust so they can be used properly. Pegboard hooks can be used to hang tools and accessories.
What tools should I start with when becoming a woodworker?
Woodworking is an art. It requires patience. It takes time to master all the tools and techniques involved in woodworking.
There are many different types of woodworking equipment available on the market today. Some people prefer to use power tools while others prefer manual tools.
You have the freedom to choose what tool you want, but it is important that you select the right tool for your job. It may be a good idea to start with a basic set, if possible, if you don’t know much about hand tools.
Another option is to learn how to use a router, which is used for cutting intricate shapes into wood. These routers can be purchased at most hardware and home improvement stores.
Statistics
- Average lumber prices rose about 600 percent between April 2020 and May 2021. (familyhandyman.com)
- Overall employment of woodworkers is projected to grow 8 percent from 2020 to 2030, about as fast as the average for all occupations. (bls.gov)
- If your lumber isn't as dry as you would like when you purchase it (over 22% in Glen Huey's opinion…probably over 10-15% in my opinion), then it's a good idea to let it acclimate to your workshop for a couple of weeks. (woodandshop.com)
- Woodworkers on the lower end of that spectrum, the bottom 10% to be exact, make roughly $24,000 a year, while the top 10% makes $108,000. (zippia.com)
External Links
How To
Here are some tips on how to drive nails in wood
When driving a nail into wood, it is important to first choose the correct size and kind of hammer. The most commonly used types of Hammers are claw hammers. Each type of hammer has its pros and cons. A claw hammer is best for hitting nails or hard objects. However, it can be difficult to pinpoint exactly where the blow will land. The sledgehammer works well for large areas, but is too heavy for smaller tasks.
After choosing the right hammer, place your hand flat against the side of the head so that the handle rests comfortably in your palm. Grip the handle firmly, but don't squeeze it so tightly that you hurt yourself. The hammer should be held straight up with your wrist relaxed. Swing the hammer back towards the ground, with your aim at the middle of the nail. You should feel the impact of the hammer striking the nail. Practice swinging your hammer on a block of wooden until you feel comfortable.
Hold the hammer near your body until you're ready for the nail to be driven. The nail should be perpendicular to wood's surface. Your eyes should be focused on the nail's tip. Swing the hammer forward, and then move the hammerhead. This can be repeated several times to increase the speed of your swing. Once you have mastered this technique, increase the power of your swings. Try holding the hammer above your shoulder and bring it down forcefully. You will be able to use more energy and put your best foot forward.
Once you've nailed the first hole, remove the hammer from the nail. To remove the remainder of the nails, you can use a screwdriver/pry bar. To prevent splitting the wood, ensure you keep the nail heads flush against the board's surface.